

Introduction:
CUDA, short for Compute Unified Device Architecture, is Nvidia's parallel computing platform that allows developers and engineers to build incredibly powerful computation systems and programs through the use of GPUs, known as Graphics Processing Units. With the development of CUDA, developers can now easily use their Nvidia GPUs for computationally-expensive tasks.
Difference between GPU and CPU for parallel processing
You might be asking yourself why CUDA and GPU programming matters. The reason why is because while CPUs are great for general-purpose computing, GPUs are good for computationally-expensive workloads. If you need to programmatically add 2 very large vectors or multiply matrices, a modern GPU can handle the operations in parallel whereas a CPU would need to process the operations serially albeit in parallel if the processing is multi-threaded.
This post serves as a basic tutorial for getting CUDA running on a GPU and running a custom built kernel that will add 2 vectors.
For this exercise, the readers should have a somewhat modern GPU. An RTX 5050 or even a GTX 1080 will work fine in a 22.04 version of Ubuntu Linux.
For this guide we are using Ubuntu 22.04. If you have a different version of Ubuntu or distribution of Linux, you will need to adjust your installation step.
Installing Nvidia drivers and CUDA:
The first thing that you should do on your ubuntu 22.04 machine is install the Nvidia drivers and CUDA packages so that your programs can dispatch workloads to the GPU.
This can be done by running the following commands. If you run something besides Ubuntu 22.04, then adjust the commands to whatever version of Ubuntu or other distribution that you are running.
wget https://developer.download.nvidia.com/compute/cuda/repos/ubuntu2204/x86_64/cuda-keyring_1.1-1_all.deb
sudo dpkg -i cuda-keyring_1.1-1_all.deb
sudo apt update

sudo apt install cuda

sudo reboot
Once this runs and the machine reboots, run the following:
nvidia-smi

nvcc --version
You should get an output that looks similar to the following:
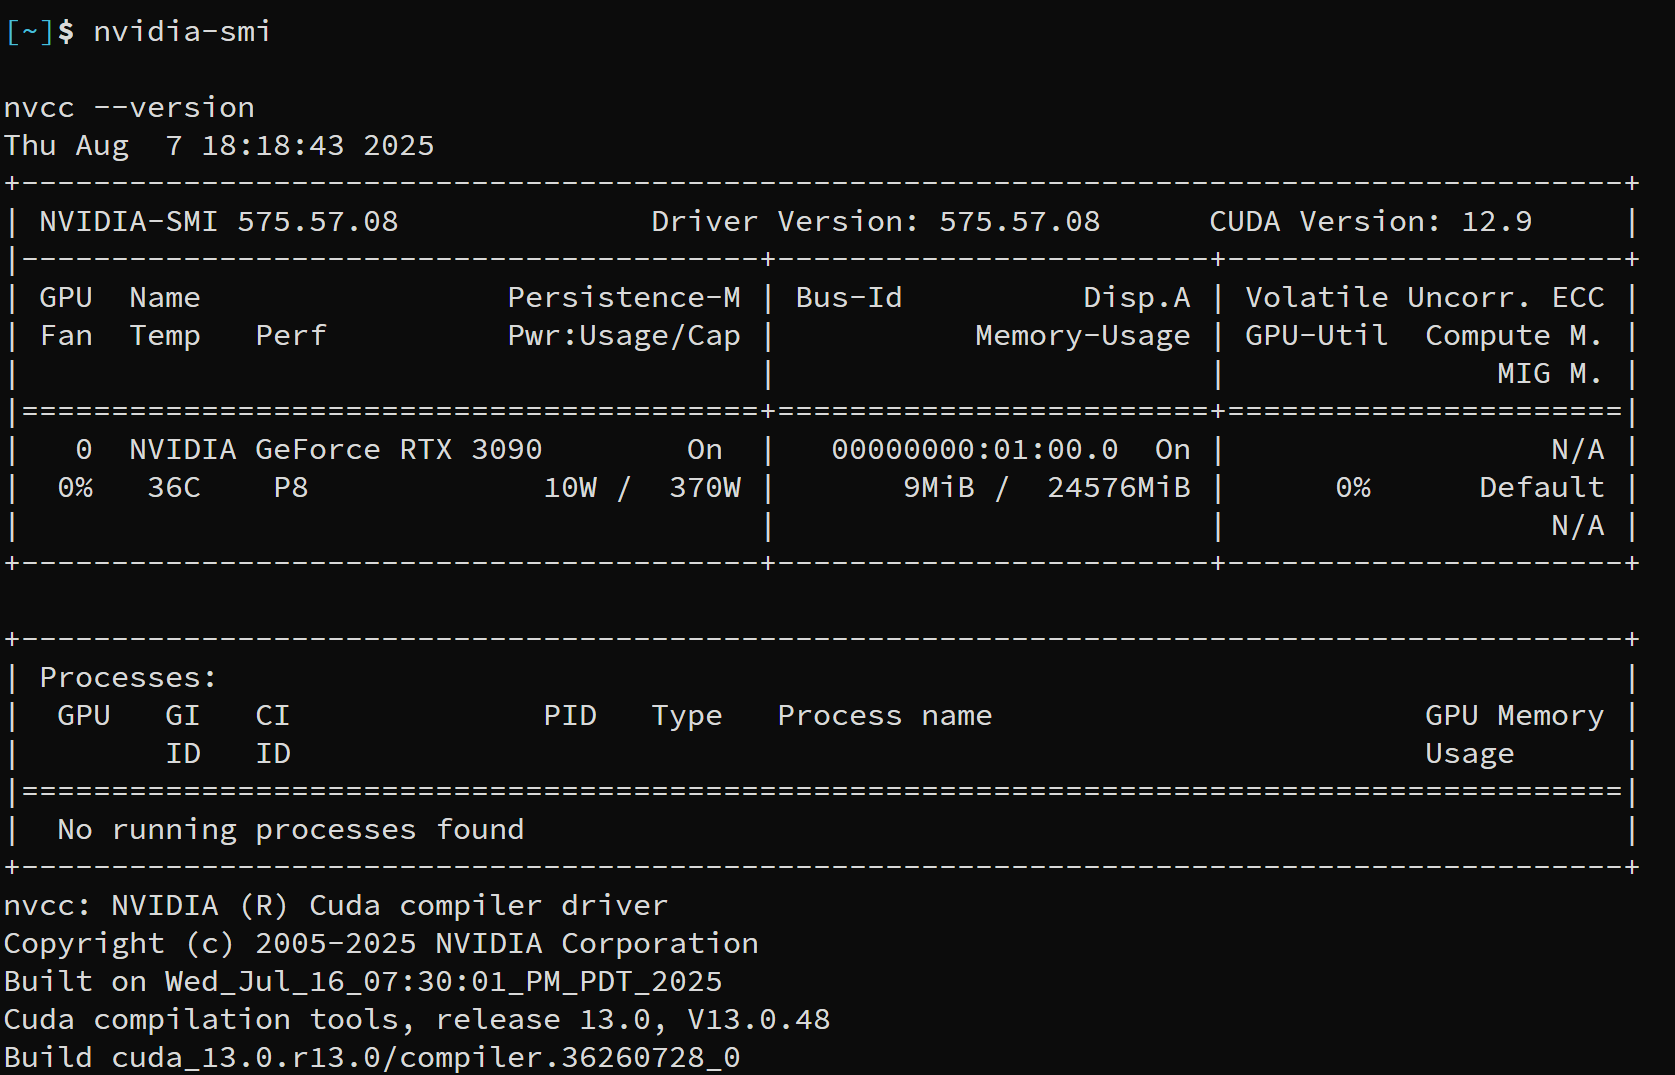
In my case, I have an RTX 3090 installed.
Running the add vectors CUDA kernel:
In a add_vectors.cu file, insert the following
#include <stdio.h>
#include <stdlib.h>
#include <cuda_runtime.h>

__global__ void add(float *a, float *b, float *c, int n) {
    int i = blockIdx.x * blockDim.x + threadIdx.x;
    if (i < n) c[i] = a[i] + b[i];
}

void check(cudaError_t err, const char *msg) {
    if (err != cudaSuccess) {
        printf("Error: %s - %s\n", msg, cudaGetErrorString(err));
        exit(1);
    }
}

int main() {
    int n = 1024;
    size_t size = n * sizeof(float);

    float *a = (float*)malloc(size);
    float *b = (float*)malloc(size);
    float *c = (float*)malloc(size);

    for (int i = 0; i < n; i++) {
        a[i] = i;
        b[i] = i * 2;
    }

    float *d_a, *d_b, *d_c;
    check(cudaMalloc(&d_a, size), "malloc a");
    check(cudaMalloc(&d_b, size), "malloc b");
    check(cudaMalloc(&d_c, size), "malloc c");

    check(cudaMemcpy(d_a, a, size, cudaMemcpyHostToDevice), "copy a");
    check(cudaMemcpy(d_b, b, size, cudaMemcpyHostToDevice), "copy b");

    int threads = 256;
    int blocks = (n + threads - 1) / threads;

    add<<<blocks, threads>>>(d_a, d_b, d_c, n);
    check(cudaGetLastError(), "kernel launch");
    check(cudaDeviceSynchronize(), "sync");

    check(cudaMemcpy(c, d_c, size, cudaMemcpyDeviceToHost), "copy result");

    for (int i = 0; i < 10; i++) {
        printf("%.0f + %.0f = %.0f\n", a[i], b[i], c[i]);
    }

    cudaFree(d_a);
    cudaFree(d_b);
    cudaFree(d_c);
    free(a);
    free(b);
    free(c);

    return 0;
}
Running the kernel:
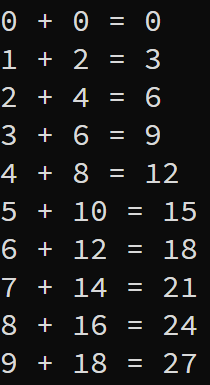
Now that we have a basic CUDA file, we can compile and run it by running the following commands:
nvcc -o vector_add vector_add.cu
./vector_add
After running this program, you should see an output that matches the following:
And now you have run your first add vectors CUDA kernel! If you want to dive deeper you can check dive into this kernel and driver program in the next blog post!